How to Do a Hanging Indent in Google Docs (2026 Guide)


Quick answer: To create a hanging indent in Google Docs, highlight your text, click Format → Align and indent → Indentation options, set Special indent to Hanging, enter 0.5 inches, then click Apply. Your first line stays at the left margin and every line beneath it indents automatically.
Now here's the part that annoys me.
I've watched students burn a full hour on this. An hour. On formatting.
The actual fix takes eleven seconds once you know where Google buried the setting. The problem was never difficulty — it's discoverability. Google tucked the control three menus deep, and almost nobody stumbles onto it by accident.
So below, you'll get every reliable way to create a hanging indent in Google Docs: the desktop menu path, the ruler trick, the keyboard workaround, mobile (it's rough, but there's a way through), a full troubleshooting checklist, and a style-by-style requirements table.
Let's get into it.
What Is a Hanging Indent, Exactly?
Before you go clicking around menus, it helps to know what you're actually building. A hanging indent — sometimes called a reverse indent or a second line indent — is a paragraph format where the first line sits flush against the left margin and every line after it gets pushed inward. It's the exact opposite of the first-line indent you learned in grade school. And it exists for one reason: scannability. When a reader skims a reference list, the author's last name juts out on the left like a tab in a filing cabinet.
That's the whole design logic.
Consider what a works cited page looks like without one. Every line starts at the same spot. Entries blur together. Your reader — usually a professor with forty other papers to grade — has to actually read each line to find where one citation ends and the next begins.
Now add the indent. Suddenly the page has structure.
That's why APA, MLA, and Chicago all require it.
Why This Matters More Than You'd Think
Formatting feels like busywork until you look at how many people it touches. According to figures compiled by ClickUp from APA's own data, 85.9% of US doctoral degrees are awarded in fields that either require APA Style (53.6%) or permit it as an option (32.3%). Every one of those disciplines expects a hanging indent on the reference page.
And the standard depth has been settled for decades: 0.5 inches, or 1.27 cm. APA, MLA, Chicago, and Turabian all landed on the same number — a rare moment of agreement between style guides that disagree about almost everything else.
So this isn't a stylistic preference. It's a compliance requirement with a fixed value.
Where You'll Actually Use It
The reference list is the obvious case, but it's not the only one. I use hanging indents constantly outside academia, and once you notice the pattern you'll spot it everywhere — glossaries, résumé skill sections, play scripts where the speaker's name hangs left of the dialogue, indexes at the back of nonfiction books. The format solves one universal problem: making a long list of paired items scannable without bullets or extra whitespace.
Here's where it shows up most:
APA reference list entries
MLA works cited entries
Chicago bibliography entries (but not Chicago footnotes — more on that shortly)
Glossaries and term definitions
Résumés and CVs
Scripts and screenplays
How to Do a Hanging Indent in Google Docs (The Reliable Method)
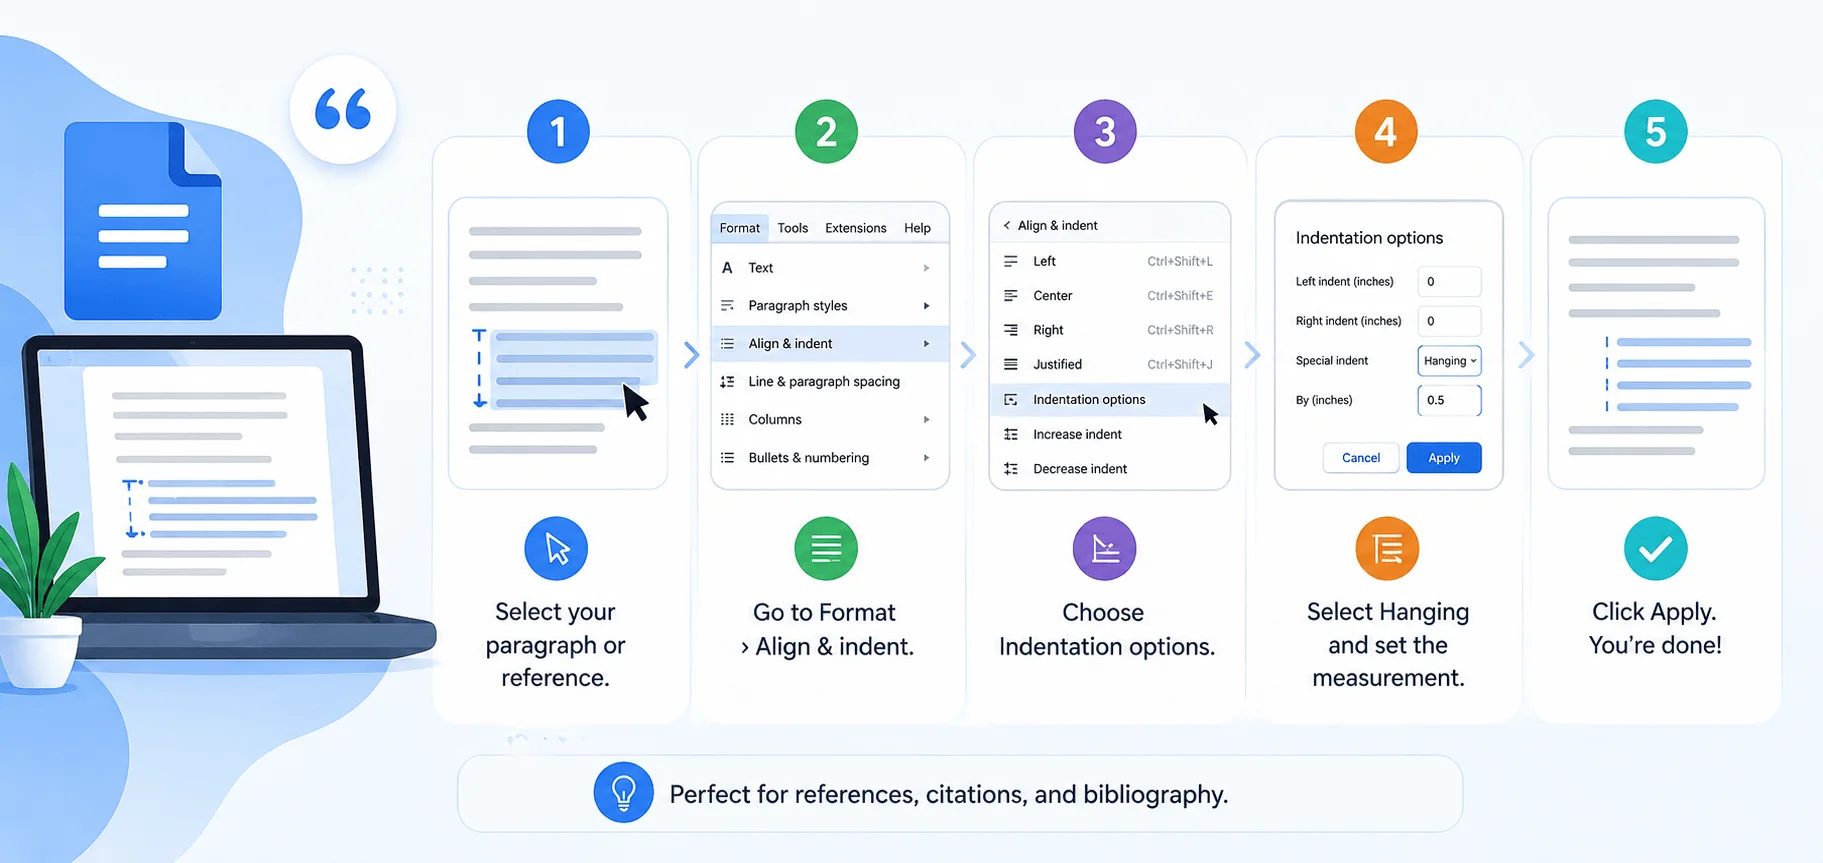
This is the method to memorize. It works on long documents, survives copy-paste, and doesn't break when you add a citation later. Everything else in this guide is a fallback. I call it "reliable" because unlike the ruler, it applies a genuine paragraph property rather than a visual nudge — so your formatting holds when the document gets exported, shared, or opened at a different zoom level.
Here's the step-by-step guide:
Step 1. Highlight the text you want to format. Got a full bibliography? Select the whole thing at once.
Step 2. Click Format in the top menu bar.
Step 3. Hover over Align and indent.
Step 4. Click Indentation options.
Step 5. Find the Special indent dropdown. Switch it from "None" to Hanging.
Step 6. Set the value to 0.5 inches (or 1.27 cm if your Docs is set to metric).
Step 7. Hit Apply.
Done. First line stays put, everything beneath slides right.
One detail that matters enormously: make sure each citation is its own paragraph. Press Enter between entries, not Shift + Enter. Use a soft line break and Google Docs treats the whole block as a single paragraph — you'll get one hanging indent instead of five.
That single mistake causes maybe half the "it's not working" complaints I see.
While you're in there, you'll also want your reference list double-spaced with one-inch margins. APA and MLA both require it. And if your paper includes data, here's how to create charts in Excel to drop in alongside it.
Which Method Should You Actually Use?
Three methods exist. They are not equally good, and picking the wrong one is why people end up redoing their bibliography twice. Here's the honest comparison:
Method | Reliability | Speed | Works on Mobile? | Best For |
|---|---|---|---|---|
Indentation options menu | High — sets a true paragraph property | Medium (7 clicks) | No | Full reference lists, final drafts, anything you'll edit later |
Ruler drag | Medium — easy to overshoot the exact depth | Fast (2 drags) | No | Quick visual tweaks, single paragraphs |
Shift + Enter and Tab | Low — hard-codes line breaks that break on edit | Slow for long lists | Yes (only option) | 2–3 citations you'll never touch again |
If you're formatting a real bibliography, use the menu. Every time.
The Google Docs Ruler Method (Fast, But Fiddly)
If you think visually, the ruler gives you drag-and-drop control. I'll be honest: I don't love it for finished documents, because it's easy to overshoot by a hair and land on a 0.47-inch indent that looks almost right. But it's genuinely faster for one-off adjustments, and it's the only method where you see the change happen in real time. Some people just work better that way.
First, make the ruler visible. Click View and confirm Show ruler is checked.
Now look at the far-left edge of that ruler. Two light blue shapes sit stacked on each other:
The rectangle on top controls the first line indent
The triangle below controls the left indent
The sequence:
Step 1. Highlight your text.
Step 2. Drag the triangle (left indent) right to the 0.5-inch mark. All lines move.
Step 3. Drag the rectangle (first line indent) back to the left margin at zero.
That second drag is the entire trick. The rectangle moves independently, pulling line one back out while everything else stays indented.
Nine times out of ten, when someone says the ruler "doesn't work," they grabbed the wrong shape. Android Authority's walkthrough illustrates the same rectangle-versus-triangle distinction if you want a visual.
Keyboard Shortcuts and the Tab Workaround
Let me set expectations first. There is no single dedicated keyboard shortcut that applies a true hanging indent in Google Docs the way Ctrl + T does in Microsoft Word. That's a genuine product gap, and it's been an open complaint on the Google Docs Editors Help forum for years. What you get instead are adjacent shortcuts plus one manual workaround that fakes the look well enough for short lists.
The indent shortcuts that do exist:
Ctrl + ] — increase indent (Windows)
Ctrl + [ — decrease indent (Windows)
Cmd + ] / Cmd + [ on Mac
Those shift the whole paragraph, though. Not the same thing. (There's a fuller list in our guide to Google Docs keyboard shortcuts.)
The manual workaround: type your first line, press Shift + Enter for a soft line break, then press Tab. Repeat for each wrapped line.
It looks right. It is not right.
Because you've hard-coded the breaks, the text won't reflow if you change fonts, margins, or spacing. Edit one word and the entry collapses. Reach for this only if you're writing three citations and never touching them again.
How to Make a Hanging Indent in Google Docs on Mobile and iPad
Here's the part nobody wants to hear. The Google Docs mobile app — Android and iPhone both — does not include the ruler or the Indentation options panel. Those controls aren't in the interface at all. So the reliable method above simply isn't available on your phone, and no amount of menu-digging will surface it. This is a real feature gap, not something you're overlooking.
Three ways around it:
Option 1: The soft break workaround
Tap into your text and use soft line breaks plus Tab to fake the indent manually. Tedious and fragile, but it renders correctly on screen.
Option 2: Format on desktop first
Apply the hanging indent in a browser, then open the doc on mobile. The formatting persists perfectly — you just can't create or edit it there.
Option 3: Request desktop site
On an iPad or Android tablet, open Docs in Chrome and enable "Request desktop site." You get the full Format menu including Align and indent. Cramped, but functional.
Honestly? If you're formatting a reference list, do it on a laptop. Fighting the mobile app costs more time than walking to your desk.
Troubleshooting: Why Your Hanging Indent Isn't Working
Formatting problems in Docs almost always trace to one of four causes, and once you know them you can diagnose the issue in about five seconds. I've walked enough people through this to say confidently that it's rarely a bug — it's usually a selection problem or a paragraph-break problem. Run this checklist before assuming Google broke something.
You didn't select the text
Applying Indentation options with your cursor just sitting inside a paragraph affects only that paragraph. Highlight everything first.
You used soft line breaks between entries
Shift + Enter merges entries into a single paragraph. Use plain Enter so each citation is its own paragraph.
You dragged the wrong ruler marker
The rectangle handles line one. The triangle handles the rest. Swap them and you get a first-line indent instead of a hanging one.
Your text carried foreign formatting
Pasting from a citation generator or a PDF drags hidden styles along. Fix it with Ctrl + Shift + V to paste as plain text, then apply the indent fresh.
Still stuck? Select the block, hit Format → Clear formatting, and start over. Nuclear option, but it works.
Style Guide Requirements at a Glance
Every major style guide asks for the same 0.5-inch measurement — but they apply it to different parts of your paper, and one of them has a wrinkle that trips people up constantly. Knowing which sections need the indent and which don't will save you from a deduction that has nothing to do with your actual research.
Style | Where It Applies | Depth | Spacing | Watch Out For |
|---|---|---|---|---|
APA 7th edition | References list | 0.5 in / 1.27 cm | Double-spaced, no extra space between entries | Label it "References" — not "Bibliography" or "Works Cited" |
MLA 9th edition | Works Cited page | 0.5 in / 1.27 cm | Double-spaced throughout | Alphabetize by author surname, or title if no author |
Chicago | Bibliography only | 0.5 in / 1.27 cm | Single-space within entries, blank line between | Footnotes use a first-line indent, not a hanging indent |
Turabian | Bibliography | 0.5 in / 1.27 cm | Follows Chicago | Inherits the same footnote exception |
Harvard | Reference list | 0.5 in (varies) | Usually double-spaced | Depth varies by institution — check your handbook |
That Chicago row deserves emphasis. Chicago footnotes take a normal first-line indent while the bibliography takes a hanging indent. Two different formats in the same document. It's the single most common Chicago formatting error I see.
APA's official guidance is unambiguous on its own rule: apply a 0.5-inch hanging indent across the entire reference list so the first line of each reference stays flush left while subsequent lines indent, and double-space the whole thing without adding extra space between entries. APA Style
For style-specific walkthroughs, see our APA format guide and MLA format guide. And when in doubt, ask your instructor — university style sheets deviate from the official manuals more often than you'd expect. Library guides like Nashua Community College's make a good sanity check.
How to Create a Hanging Indent in Word, Pages, Slides, and CSS
Google Docs isn't the only place you'll need this. If you draft in one tool and submit in another, or you're building a web page rather than a paper, the concept transfers — the controls just live somewhere else. Here's the equivalent in every major environment, so you're not hunting through a new menu the next time your workflow shifts.
Microsoft Word
Select your text and press Ctrl + T (Windows) or Cmd + T (Mac). That's it — Word actually has the dedicated shortcut Docs lacks. The menu route is right-click → Paragraph → Indentation → Special → Hanging → 0.5".
Apple Pages
Select your text, open the Format sidebar, click Layout, then find Indents. Set the Left value to 0.5" and the First value to -0.5". The negative first-line value is what creates the hang.
Google Slides
Slides has no Indentation options panel. Use the ruler instead — same rectangle-and-triangle technique from earlier. Turn it on via View → Show ruler.
HTML and CSS
For web content, one rule does it:
css
p.citation {
  padding-left: 2em;
  text-indent: -2em;
}
Positive padding pushes the block right; the negative text-indent pulls line one back out. Same logic as the Pages method.
Editor World's cross-platform breakdown covers additional environments if you need them.
Habits That'll Save You Time
After you've done this a hundred times, shortcuts emerge. None of these are strictly necessary — but they're the difference between formatting a bibliography in ten seconds versus ten minutes, especially if you write papers regularly rather than once a semester.
Build a template. Keep one Google Doc with your margins, font, spacing, and a pre-formatted hanging indent paragraph. Duplicate it for every new paper.
Format the whole list at once. Don't do citations one at a time. Paste them all in, select everything, apply once.
Use the paint format tool. Select a correctly formatted entry, click the paint roller icon, then drag across unformatted text. Instant copy.
Format before you add more. New paragraphs inherit the style of the one above — so format first, then keep typing, and each new citation formats itself.
Formatting eats more time than people admit. If you're on a lot of video calls for group projects, the same logic applies to blurring your background on Zoom — set it once, never think about it again.
Frequently Asked Questions
Below are the questions that come up most, answered directly. If you're skimming for one specific fix, start here.
What is the keyboard shortcut for a hanging indent in Google Docs?
There isn't one. Google Docs has no dedicated shortcut for hanging indents. Ctrl + ] increases the indent of an entire paragraph, but that's not the same thing. Microsoft Word does have one — Ctrl + T.
Why is my hanging indent not working in Google Docs?
The most common cause is not selecting your text before applying the format. The second most common is using Shift + Enter between entries, which merges them into one paragraph. Highlight the full block, make sure each citation is separated by a plain Enter, then apply.
Can I do a hanging indent on the Google Docs mobile app?
Not directly. The ruler and Indentation options panel don't exist in the mobile app. Your options are a manual soft-break-and-Tab workaround, formatting on desktop first, or requesting the desktop site in a tablet browser.
How deep should a hanging indent be?
0.5 inches, which equals 1.27 cm. APA, MLA, Chicago, and Turabian all specify the same depth. Type the number rather than eyeballing it on the ruler.
Do Chicago footnotes need a hanging indent?
No. Chicago footnotes use a standard first-line indent. Only the bibliography takes a hanging indent. Mixing these up is the most frequent Chicago formatting error.
What's the difference between a hanging indent and a first line indent?
They're inverses. A first-line indent pushes only line one inward and leaves the rest at the margin — standard for body paragraphs. A hanging indent leaves line one at the margin and pushes everything else inward — standard for citations.
Will my hanging indent survive if I download the doc as a Word file?
Yes, provided you used the Indentation options method. Because it sets a real paragraph property, it exports cleanly to .docx and PDF. The Shift + Enter workaround does not survive reliably.
Wrapping Up
The hanging indent in Google Docs isn't hard. It's just hidden.
Memorize the path — Format → Align and indent → Indentation options → Special indent → Hanging → 0.5 inches — and you'll never think about it again. Everything else here is a fallback for when you're on a phone, in a hurry, or troubleshooting something strange.
Go format that works cited page. Thirty seconds, tops.
More step-by-step guides like this one are on the LLMProGen blog.
Read more: How to Create Charts in Excel — Complete Guide (2026)
Written by
Alex
Creative blogger sharing insights, stories, and fresh ideas.