How to Scan a Document: Phone, Windows & Mac (2026 Guide)

Quick answer: To scan a document on iPhone, open Notes, tap the Attachment button, and choose Scan Documents. On Android, open Google Drive and tap the camera icon. If you own a scanner, use the free Windows Scan app on a PC or File > Import from Scanner in Preview on a Mac — and set your resolution to 300 DPI for everyday paperwork.
Now, the longer version.
I'll be straight with you. Most guides on how to scan a document start with a printer. That's backwards. Because if you're reading this, there's a good chance you don't own a scanner at all — you own a phone.
So this guide starts where you actually are, then walks you through every other method, plus the scan quality settings almost nobody bothers to explain.
Let's get into it.
Why Search Intent Should Shape How You Scan
Before I show you a single step, I want you to figure out what you're actually trying to do. Sounds obvious. It isn't. I've watched people burn twenty minutes installing printer drivers when their iPhone would've finished the job in nine seconds. The method you pick should match your goal — archiving a birth certificate is a completely different job from firing off a signed lease to your landlord. So here are the four buckets people fall into, and I'd like you to pick yours before scrolling further.
Bucket 1: You have a phone and no scanner. Skip to the phone section. You're done in a minute.
Bucket 2: You own a printer or all-in-one. Head to the Windows or Mac steps.
Bucket 3: You have a specific task — scan to PDF, scan to email, scan multiple pages into one file, or scan a document into Word.
Bucket 4: Quality matters. Legal records, tax paperwork, archival stuff. You need the DPI and OCR sections.
Honestly? Most people are Bucket 1 and don't know it yet.
How to Scan a Document With Your Phone (Free, No App Needed)
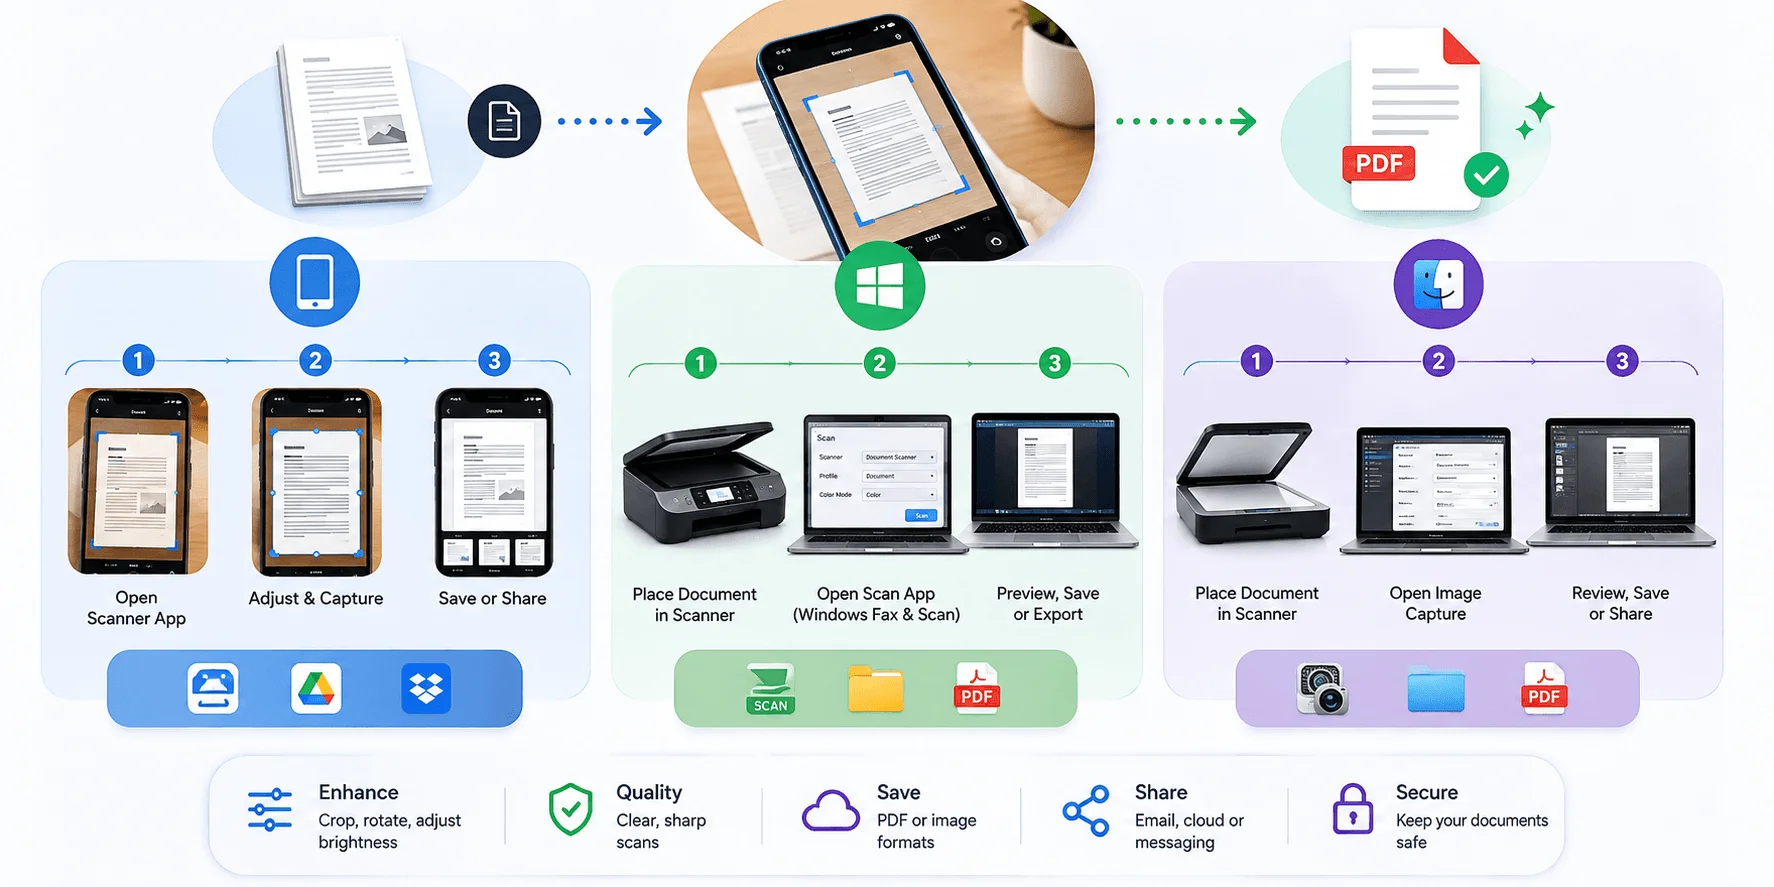
Here's the thing that surprises people: your phone already has a document scanner baked in. No download. No subscription. No watermark stamped across your tax return. Both Apple and Google shipped this years ago and barely told anyone. The edge detection is genuinely good now, the perspective correction straightens crooked shots automatically, and the output is a real PDF — not a photo pretending to be one. Let me show you both platforms.
How to Scan a Document on iPhone or iPad
Apple hid this inside Notes, which is a strange choice, but it works beautifully. The whole flow takes under a minute once you've done it once, and it produces a properly cropped, contrast-corrected PDF rather than a lopsided camera roll photo. Here's the exact sequence, straight from Apple's official support docs.
Step-by-step: scanning in the Notes app
Open Notes and create a new note.
Tap the Attachment button, then tap Scan Documents.
Hold your document in view of the camera.
In Auto mode, it captures by itself. Otherwise, tap the Shutter button or press a Volume button.
Drag the corners to fit the page, then tap Keep Scan.
Tap Done — or keep scanning to build a multi-page file.
Scanning from the Files app instead
You can do the exact same thing from the Files app: tap the More button, then Scan Documents, then choose where to save. Same engine, different front door.
One more thing worth knowing. On iOS 26, Apple added a dedicated Preview app with its own scanner, and Live Text reads the words inside your scan automatically — meaning you can copy and search that text without running a separate OCR step. That's quietly a big deal.
How to Scan a Document on Android
Android users, Google Drive is your tool. It's been there for years, buried behind a camera icon most people assume just takes photos. It doesn't — it auto-detects page edges, crops, and can save a searchable PDF straight to your account.
Step-by-step: scanning in Google Drive
Open the Google Drive app.
Tap the Camera icon at the bottom right.
Point at your document — a blue line outlines the page.
Name the file, then pick .pdf or .jpg.
Tap Location to choose a Drive folder.
Hit Save.
Pro move: Drive has a scan widget. Drag "Drive scan" onto your home screen, point it at a folder, and you've got one-tap scanning forever.
The Files by Google alternative
Prefer something outside Drive? Files by Google has a Scan button bottom-right with both Auto capture and Manual modes, and it saves searchable PDFs too.
How to Scan a Document on Windows 11 and Windows 10
Alright, you've got real hardware. Good — a flatbed will beat a phone on fine print and faded ink every single time. The frustrating part is that Windows buried its scanning tool, and half the people upgrading from Windows 10 genuinely can't find it anymore. I get why. The old Windows Fax and Scan is still around but no longer front and center, and the modern replacement lives in the Microsoft Store instead of shipping preinstalled. Here's the fastest path.
Step 1: Connect and confirm
Microsoft says that in most cases, setup is just plugging the USB cable in and switching the scanner on. Windows handles the rest.
Step 2: Get the Windows Scan app
Right-click Start → Search → type "Scan." If nothing appears, grab Windows Scan free from the Microsoft Store.
Worth knowing: the app works with scanners using WIA drivers — that covers most modern devices — and it only runs on Windows 10 and 11.
Step 3: Choose your file format and resolution
Pick your source (flatbed or feeder), your file format, and your scan resolution.
To scan to PDF directly, set File type to PDF before you hit Scan. That one setting saves you a conversion step.
Step 4: Find your saved scan
Didn't pick a folder? Microsoft saves it to Pictures/Scans by default. That's where 90% of "where did my scan go" panic ends.
Stuck on an older setup? You can re-enable Windows Fax and Scan through Optional Features in Settings. It can't export PDFs directly — but Microsoft Print to PDF covers that gap. If Windows refuses to see your hardware at all, our guide on fixing a scanner not detected in Windows 11 walks through the driver fixes.
How to Scan a Document on a Mac
Mac users have it easier, and I say that as someone who uses both. Preview — the app you probably think of as "the thing that opens PDFs" — is a fully capable scanning front end. It handles flatbeds, feeders, duplex scanning, and even pulls scans wirelessly from your iPhone. No third-party software required, no driver hunting, no bloated manufacturer suite eating 400MB of disk space. Here's how it goes.
Step-by-step: scanning in Preview
Per Apple's Preview documentation:
Choose File > Import from Scanner > [your scanner].
Click Show Details to unlock the good stuff.
Set Scan Mode — Flatbed or Document Feeder.
Set Kind: choose Text for high-contrast black-and-white pages, Black & White for grayscale, Color for color.
Under Orientation, tick Duplex to capture both sides.
Set Image Correction and your Scan To destination.
Scan.
The feeder trap nobody warns you about
Apple notes that every page in the feeder shares the same settings — so if some pages need grayscale and others need color, run them as separate batches. Learned that one the annoying way.
And if you'd rather use your phone as the capture device? File > Import from iPhone or iPad > Scan Documents. That's Continuity Camera, and it's shockingly smooth.
And if you're spending real time in Preview, a handful of Mac keyboard shortcuts will cut the clicking down considerably.
Flatbed vs. ADF: Which Scanner Setup You Actually Need
Quick detour, because this decision affects everything downstream. Not all scanning hardware behaves the same way, and picking wrong means either wrecked originals or a stack of crooked, jammed pages. The two dominant formats are the flatbed scanner and the automatic document feeder, and they solve genuinely different problems. Here's how the pros split it.
Flatbed scanner | Automatic document feeder (ADF) | |
|---|---|---|
Best for | Delicate items, photos, single high-quality pages | Multi-page and double-sided stacks |
Loading | Face-down, aligned to the corner arrow | Flush stack in the tray |
Speed | Slow, one page at a time | Fast, unattended batches |
Main risk | Tedium on long documents | Jams and skewed pages |
Duplex | Manual flip | Built in on most models |
Ricoh's scanner team recommends the flatbed — document face-down, aligned to the corner arrow on the glass — for anything fragile, and the ADF for bulk, with the stack squared up first to prevent jams.
Simple rule I use: fragile or precious → flatbed. Bulk → feeder.
The Right DPI: Scan Settings Most Guides Skip
This is where I think most articles fail you, so I'm going deep. Resolution determines whether your scan is legible in ten years or a blurry mess your OCR software chokes on. Too low and text turns to mush. Too high and you're sitting on a 400MB file that won't attach to an email. The U.S. National Archives has published hard numbers on this, and I'd trust them over any blog guess — including mine.
First, terminology. Archival guidelines clarify that PPI (pixels per inch) is the accurate term for digital capture, while DPI describes printer and hardware optics. Most software uses them interchangeably. Don't lose sleep over it.
Now the actual specs, from NARA's requirements for textual records:
Bit depth | Resolution range | Recommended | Best for |
|---|---|---|---|
Bitonal (1-bit) | 300–600 ppi | 600 ppi | Clean printed type, high contrast |
Grayscale (8-bit) | 300–400 ppi | 400 ppi | Faded, stained, or handwritten pages |
Color (24-bit RGB) | 300–400 ppi | 400 ppi | Color originals and illustrations |
And the floor? The minimum NARA requires for permanent records is 300 DPI.
For everyday paperwork, 300 DPI is the sweet spot — sharp text, sane file size. If yours are ballooning anyway, see our notes on reducing scanned PDF file size.
Doing serious archival work? Industry practice is climbing: 400 dpi as a minimum, 600 dpi as an average, with uncompressed TIFF as the master file and PDF/A for long-term storage.
OCR: Turning Your Scan Into Searchable Text
Here's something people don't realize until it bites them. A scan is a picture. You can't search it, you can't copy from it, and a screen reader can't read it aloud. That's fine for a receipt. It's a disaster for a 90-page contract you'll need to search next spring. Optical Character Recognition fixes this, and understanding how it works will make your scans dramatically more useful.
OCR converts a document image into machine-readable text that can be searched, copied, and read by assistive technology.
Under the hood? Simple engines store fonts as templates and pattern-match character by character. That approach hits a wall fast, since font and handwriting variations are effectively infinite. Modern systems use ICR (intelligent character recognition) instead.
The single biggest lever on accuracy is your source image. OCR engines analyze pixel patterns — unclear patterns produce errors. That's exactly why 300 DPI keeps coming up.
Running it in Acrobat? Go to All tools > Scan & OCR > Recognize Text, then use Review recognized text to verify accuracy and reading order. Heads up though: free Acrobat Reader doesn't include OCR — you need Standard or Pro.
Handwriting is the weak spot. Neat print converts well; cursive struggles.
Best Scanner Apps Worth Paying Attention To
If the built-in tools aren't cutting it, a few apps genuinely earn their place. I'd argue most people never need one — but batch scanning, cloud sync, and legacy hardware support are real reasons to upgrade. Here's my shortlist, and our fuller scanner app comparison goes deeper.
App | Platform | OCR | Free tier | Best for |
|---|---|---|---|---|
Notes / Files | iOS | Yes (Live Text) | Fully free | Fastest phone scanning |
Google Drive | Android | Yes | Fully free | Searchable PDFs, cloud sync |
Adobe Scan | iOS, Android | Yes | Free w/ account | Cleanest output quality |
NAPS2 | Windows, Mac | Yes | Open source | Desktop batch scanning |
VueScan | Windows, Mac | Yes | Limited free | Old, unsupported hardware |
Adobe Scan captures documents, forms, business cards, and whiteboards, with automatic boundary detection and AI that fixes perspective, sharpens text, and kills glare and shadows. It's the strongest free third-party pick, though it nudges you toward a subscription.
VueScan supports 7,600+ scanner models, including discontinued hardware. If your ancient scanner lost driver support, start here.
One caution: CamScanner had a 2019 malware incident. It's back on app stores, but I'd pick something else for sensitive documents — and if you're weighing where your scans are safest, our comparison of Android vs. iOS security is worth a read.
A Better Option: Don't Scan at All
Controversial closer, but stay with me. Scanning is a workaround for a paper-first process — and sometimes the smarter move is skipping the paper entirely. Accessibility experts have been saying this for years, and once you hear the reasoning, printing-then-scanning starts to feel a little absurd.
Colorado's Office of Information Technology puts it plainly: scanned documents are essentially large images of text, which creates an accessibility problem. A digital document with a digital signature is more accessible than a printed-and-scanned one — and remediating a PDF after OCR takes longer than exporting properly from Word with a signature field in the first place.
So before you print something just to sign and scan it — ask whether you need to.
Frequently Asked Questions
Quick answers to the questions that come up most often. If you're skimming for one specific fix rather than reading start to finish, this is your section — and each answer points back to the fuller explanation above.
What DPI should I scan a document at?
300 DPI for everyday documents. That's also the minimum NARA requires for permanent records. Bump to 400 ppi for faded or handwritten pages, and 600 ppi for clean printed type you're archiving.
Can I scan a document without a scanner?
Yes. Your phone is a capable scanner. Use Notes or Files on iPhone, or Google Drive on Android — both are free, work offline, and produce real PDFs with automatic edge detection.
How do I scan multiple pages into one PDF?
Use an ADF if you have one, or keep tapping Keep Scan on your phone before hitting Done. In Windows Scan, choose Feeder as the source and set File type to PDF.
Why is my scan blurry?
Usually resolution or lighting. Raise your scan to at least 300 DPI, clean the flatbed glass, and on a phone avoid casting a shadow across the page. Blurry input also wrecks OCR accuracy.
How do I reduce a scanned PDF's file size?
Scan in grayscale or bitonal instead of color, drop to 300 DPI, and avoid uncompressed TIFF unless you need an archival master.
Does OCR work on handwriting?
Partly. Neat printed handwriting usually converts well. Cursive and stylized writing produce noticeably more errors across most engines.
Why won't Windows detect my scanner?
Most often a driver issue. Windows Scan needs a WIA-compatible driver, and it only runs on Windows 10 and 11. Reinstall the manufacturer's driver, then reconnect.
Can I scan a document into Word?
Not directly. Scan to PDF, run OCR, then export the recognized text to Word — Acrobat Standard or Pro handles this in one pass.
That's everything I'd want to know about how to scan a document — from the free phone method most people overlook, to the DPI and OCR settings that separate a usable archive from a folder of blurry images.
Now go scan something. You've got everything you need.
Written by
Alex
Creative blogger sharing insights, stories, and fresh ideas.