
To clean laptop fan, power down and unplug your laptop, locate the intake and exhaust vents, and use short bursts of compressed air combined with a soft bristle brush to clear loose dust. This external method helps but won't fully clean the fan blades for that, you'll need to open the chassis or get professional help. Most manufacturers recommend doing this every 3-6 months.
Now let me walk you through exactly how I learned this, the mistakes I made, and what actually works.
I still remember the day my laptop sounded like a jet engine preparing for takeoff. I was just trying to open a spreadsheet, and suddenly my fan was screaming like I'd asked it to render a Pixar movie. That's when I realized: laptop fan cleaning isn't optional maintenance it's survival.
So I did what any obsessive researcher would do. I dug through manufacturer guides, repair forums, and technician breakdowns to figure out exactly how to clean a laptop fan properly. Here's everything I learned, laid out so you don't have to do the digging yourself.
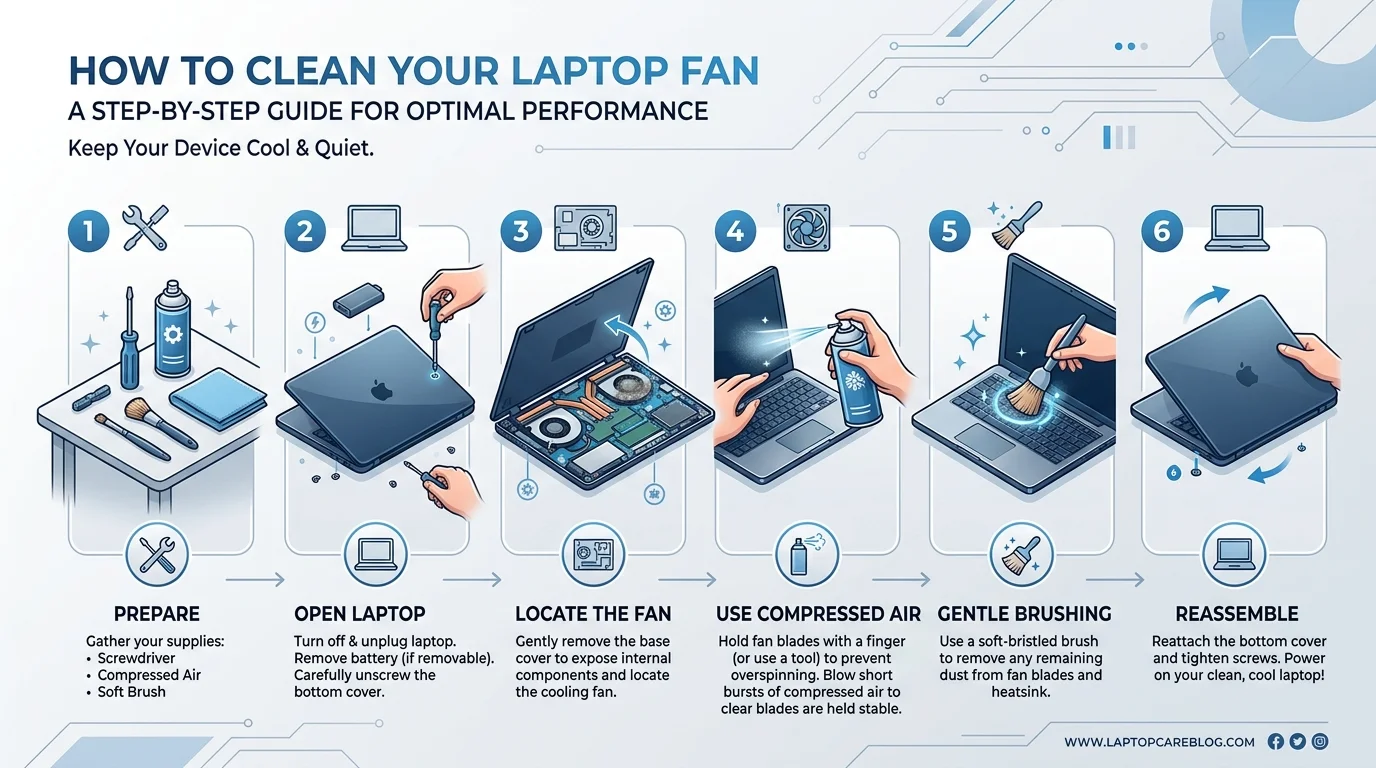
Materials You'll Need
Before we get into steps, grab these:
A can of compressed air
A soft bristle brush (an old, clean paintbrush works too)
A microfiber cloth
A vacuum cleaner with a brush attachment (optional, use carefully)
A small screwdriver set (only if you're opening the chassis)
Why Your Laptop Fan Gets Dirty in the First Place
Honestly, this part is simple. Your laptop breathes. It pulls air in, pushes hot air out, and dust just... comes along for the ride.
Over time, that dust piles up around the heatsink and blocks the tiny vents your machine depends on. And once airflow is restricted, your laptop cooling system has to work twice as hard just to keep things at a normal temperature. If you've ever wondered what a motherboard actually does, it's worth knowing that overheating doesn't just hurt your fan it puts stress on the board itself and everything mounted to it.
The Real Cost of Ignoring Dust Buildup
Here's the thing nobody tells you upfront: a dusty fan doesn't just make noise. It quietly wrecks your laptop's performance over months, not days.
In extreme cases, technicians report laptops with clogged fans hitting CPU temperatures above 95°C, with fans spinning at speeds of roughly 7,500 RPM just to keep pace — and still losing the battle against heat. That's not a healthy range for any machine. Your CPU throttles itself, your battery drains faster, and your fan works overtime just trying to compensate.
Signs Your Laptop Fan Desperately Needs Cleaning
Before you grab a screwdriver or a can of air, let's make sure you actually need to clean your fan. (Spoiler: if you're reading this, you probably do.)
According to Dell's official maintenance guide, the most common laptop overheating symptoms include a fan that runs loud or constantly, sluggish performance, and random shutdowns. These aren't random glitches — they're your laptop waving a white flag.
Physical and Audible Red Flags
I'd add a few more red flags I've noticed personally:
Your laptop feels hot to the touch, especially near the keyboard or underside
The fan spins up loudly even during light tasks like browsing
You hear grinding, ticking, or rattling noises
Your battery drains way faster than it used to
No air comes out of the vents even under heavy load
If two or more of these sound familiar, you, my friend, have a dust problem.
Step-by-Step: How to Clean a Laptop Fan Without Opening It
Let's start with the safest option first. This won't fully fix a heavily clogged fan, but it's a great first move — and honestly, it's where I'd start too.
Worth noting upfront: cleaning without opening your laptop mainly clears dust from the external vents and heatsink openings. It won't fully reach the fan blades themselves. Keep that expectation in check.
Step 1: Power Down Completely
Shut your laptop off. Unplug it. Remove the battery if you can. Let it cool for a few minutes if it's been running hot.
Step 2: Locate the Vents
Flip your laptop over (gently!) and find the intake and exhaust vents. These are usually along the sides or bottom edge.
Step 3: Use Compressed Air Carefully
Grab a can of compressed air and hold it upright. Short, gentle bursts only — never a long continuous spray.
Here's a mistake I made early on: spraying too aggressively. Turns out, blasting air straight into your vents can actually push dust deeper into the heatsink instead of out. Some technicians call this dust packing, and it's a real problem — one detailed guide explains how this can quietly choke airflow even worse than before you started.
Step 4: Brush the Loose Debris
Use a soft bristle brush to gently loosen dust clinging around the vent openings. Don't jam anything into the fan itself — no cotton swabs, no toothpicks, nothing sharp.
Step 5: Wipe It Down
Finish with a microfiber cloth to clean the exterior surfaces. It won't touch the internal fan, but it keeps things looking (and feeling) fresh.
External vs. Internal vs. Professional Cleaning: Which Should You Choose?
Here's a quick breakdown to help you decide which route fits your situation:
Method | Effectiveness | Risk Level | Cost | Time Needed |
|---|---|---|---|---|
External cleaning (compressed air + brush) | Low-Moderate — clears vents, not blades | Low | Free (if you own supplies) | 10-15 minutes |
Internal cleaning (opening chassis) | High — reaches fan blades and heatsink directly | Moderate — risk of warranty voidance or damage if inexperienced | Free-Low (tools only) | 30-60 minutes |
Professional service | Highest — includes thermal paste check | Low (handled by technician) | $40-$100+ | 1-3 days (drop-off) |
If you're not comfortable with a screwdriver, don't force it — a professional clean, especially if paired with a thermal paste check, is often worth the cost for older or heavily used machines. And if you're generally curious about what's inside your machine and how the parts fit together, our guide on how to build a PC is a good primer before you attempt any internal work.
When External Cleaning Isn't Enough
I'll be straight with you: sometimes the vent-and-air method just doesn't cut it.
If your laptop is still running hot after a thorough external clean, that's usually a sign the dust has packed itself right up against the heatsink fins. At that point, you're looking at either opening the chassis yourself or bringing it to a professional.
One especially blunt warning I found on a repair forum stuck with me — a technician explained that pushing compressed air into a badly clogged laptop without opening it can actually force debris deeper and risk damaging the fan altogether. That's not a risk worth taking on an expensive machine.
How to Tell If It's a Fan Problem, Not Just Dust
This distinction matters more than people realize. If your fan sounds like it's spinning but temperatures stay high anyway — or it pulses strangely, or makes a new scraping noise — that's likely a failing fan, not a dirty one. Cleaning only helps when the problem is physical blockage, not worn-out bearings.
How to Prevent Dust Buildup Going Forward
Cleaning is great, but prevention is honestly the smarter long-term play. Here's what actually works:
Use your laptop on a hard, flat surface. Soft surfaces like beds and couches block airflow almost instantly.
Invest in a cooling pad with a built-in dust filter. This is genuinely one of the best upgrades you can make. Instead of constantly fighting dust after it's already inside, a filtered cooling pad stops it before it ever reaches your vents.
Clean regularly. Most manufacturers, including HP, recommend cleaning your laptop externally every three to six months — more often if you're in a dusty environment.
Avoid eating or drinking near your laptop. I know, I know. But crumbs and spills are dust's best friends.
Frequently Asked Questions
How often should I clean my laptop fan?
Most manufacturers recommend cleaning every 3-6 months for average use, and every 1-3 months if you're in a dusty environment or use your laptop on soft surfaces like beds or carpets.
Is compressed air safe for laptop fans?
Yes, when used correctly — short bursts, held upright, from a safe distance. Long continuous sprays or aggressive blasting can push dust deeper into the heatsink instead of removing it.
Can I use a vacuum cleaner on my laptop fan?
You can, but only with a brush attachment and light suction. Standard household vacuums can generate static electricity, which poses a risk to internal components, so proceed carefully.
Will cleaning my laptop fan void the warranty?
Opening the chassis can void your warranty on some models. Always check your manufacturer's policy first — external cleaning with compressed air typically does not affect warranty coverage.
How do I know if it's a dust problem or a failing fan?
If temperatures stay high even though the fan is spinning fast, or you hear new grinding/ticking noises after cleaning, it's likely a hardware issue rather than dust — and cleaning alone won't fix it.
My Honest Final Take
Look, I get it — cleaning your laptop fan isn't exactly a thrilling weekend activity. But neither is replacing a fried motherboard because you ignored the warning signs for a year.
If your laptop's been running hot, loud, or just... off lately, don't wait. Start with the external cleaning method above, keep an eye on the results, and if things don't improve, it's time to get a professional involved or consider internal cleaning.
And seriously — grab yourself a dust-filtered cooling pad. It's the single easiest way to keep this whole cycle from repeating every few months. Your laptop (and your ears) will thank you.
Written by

Alex
Creative blogger sharing insights, stories, and fresh ideas.