How to Build a PC: Step-by-Step 2026 Full Cost

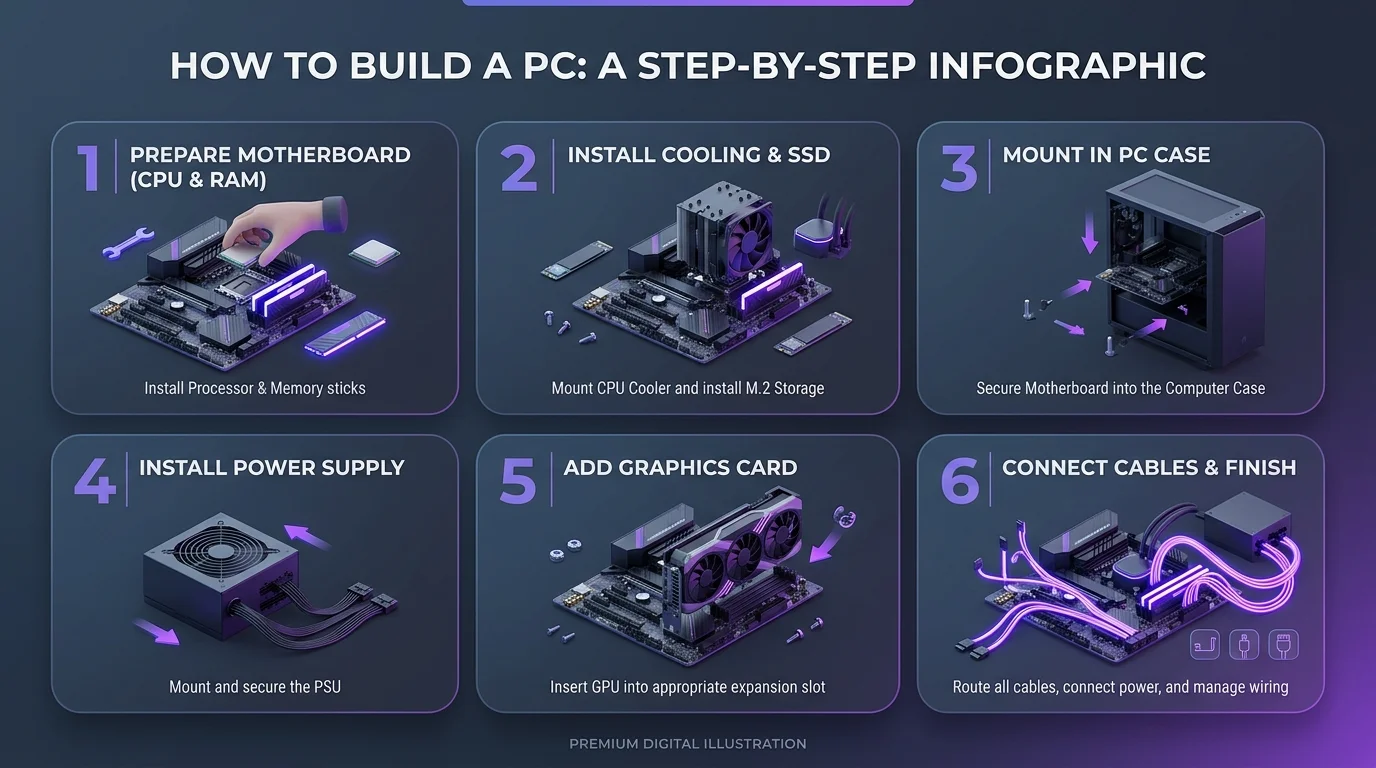
Build a PC involves picking a compatible CPU, motherboard, RAM, GPU, storage, PSU, and case, then assembling them in order — CPU, cooler, RAM, motherboard into the case, GPU, cabling, and finally BIOS setup and OS installation. Most first-time builders finish in 3–5 hours and save 20–40% compared to buying prebuilt.
I still remember the first time I cracked open a PC case and stared at a pile of components with zero idea where to start.
Sound familiar?
Here's the good news: building your own custom PC build in 2026 is easier than it's ever been. I'm going to walk you through the exact process — step by step — including the tools you'll need, common mistakes to avoid, and what to do if something goes wrong. By the end, you'll have a machine that's faster, cheaper, and more "yours" than anything off a shelf.
Let's get into it.
Why You Should Build Your Own PC (Not Buy One)
Quick gut check before we go technical: is building actually worth it?
Short answer — yes. Here's the math.
For the same components, a custom PC build typically costs 20–40% less than an equivalent pre-assembled machine from a big retailer. On a $1,500 workstation, that's $300–$600 back in your pocket — enough for a better GPU or an extra 16GB of RAM.
To put that in perspective, I ran the numbers on a mid-range build myself: a prebuilt system with a Ryzen 5 9600X, 16GB DDR5, and an RTX 4060 typically retails around $1,350. Buying the same parts individually and assembling them yourself runs closer to $1,050 — a savings of roughly $300, or 22%.
You also skip the annoying trade-offs baked into prebuilt vs custom PC decisions — a great graphics card paired with a cheap, underwhelming cooler, for example. When you build it yourself, every part is a decision you made on purpose.
Tools You'll Need Before You Start
You don't need a workshop. Here's the short list:
A Phillips #2 screwdriver (magnetic tip helps)
Zip ties or velcro straps for cable management
A flashlight or phone light
Anti-static wrist strap (optional but smart)
A clean, non-conductive surface to build on
That's genuinely it. No soldering, no special tools.
Step 1: Pick Your Platform (This Decision Drives Everything Else)
Before you buy a single part, lock in your platform — it determines every other purchase.
In 2026, you've got two solid choices: AMD's AM5 socket running DDR5 memory, or Intel's LGA1851 platform, also on DDR5. Both handle gaming and productivity well.
AM5 vs. LGA1851: Quick Comparison
Feature | AMD AM5 | Intel LGA1851 |
|---|---|---|
Memory support | DDR5 only | DDR5 only |
Upgrade path | Committed through 2027+ | Shorter, platform-dependent |
Best for | Long-term upgraders | Aggressive out-of-box boost performance |
Popular chipsets | B650, B850, X870 | B760, Z790 |
Typical entry motherboard price | Under $150 | Under $150 |
Your CPU (Central Processing Unit) choice locks in your motherboard socket compatibility — if you're not sure what a motherboard actually does or how to evaluate one, our guide on what is a motherboard breaks it down in plain terms before you buy.
CPU handles the thinking — core count matters for multitasking and rendering, clock speed matters for snappy single-threaded performance.
GPU (Graphics Processing Unit) is where most of your budget should go if gaming or creative work is the goal. VRAM is the spec to watch, especially for AI workloads or heavier creative software.
Step 2: Build Your PC Parts List (By Budget)
Once your platform's locked in, build your full PC parts list. Here's what you need — no more, no less:
CPU — the brain
Motherboard — matches your CPU socket
RAM / DDR5 memory — 16GB minimum, 32GB is the sweet spot for gaming or creative work
GPU — for rendering visuals
NVMe SSD storage — fast, no moving parts
Power Supply Unit (PSU) — never skimp here
PC case / chassis — pick one with good airflow
CPU cooler — air or AIO liquid cooler
Case fans — for airflow and thermals
Budget Tier Breakdown
Tier | Price Range | Best For |
|---|---|---|
Budget | $800–$1,000 | 1080p gaming, general use |
Mid-range | $1,300–$1,800 | 1440p gaming, light creative work |
High-end | $2,500–$4,000+ | 4K gaming, AI/ML, rendering |
Don't guess on compatibility. Run your list through PCPartPicker — it flags conflicts automatically.
Step 3: PC Assembly Steps (CPU, RAM, GPU Installation)
Okay — parts are on your desk. Time for the good part.
Grab your clean, non-conductive surface, take a breath, and skim the manuals before touching anything. Seriously, read the manuals first — it saves headaches later.
CPU Installation
Line up the notch on your CPU with the notch on the socket. It should drop in with basically zero pressure. Feel resistance? Stop — something's misaligned. Don't force it.
Close the retention arm once it's seated.
RAM Installation
Here's a tip nobody tells beginners: RAM installation takes real, noticeable force. Line the notch up, press down firmly on both ends until you hear the clips click. It'll feel like more pressure than seems reasonable — that's normal.
Mounting The Motherboard And Cooler
Drop your motherboard into the case, screw it into the standoffs, then mount your CPU cooler on top. If it shipped with pre-applied thermal paste (most do), don't add more — you'll actually hurt thermal performance.
GPU Installation
Slide your GPU into the top PCIe x16 slot, press until it clicks, then screw it into the case bracket. Connect PCIe power cables if your card needs them — most modern GPUs do.
Cable Management (Don't Skip This)
I know — cable management feels optional. It's not. Good airflow depends on it, and a messy build makes future upgrades a nightmare.
Connect your 24-pin motherboard connector first, then the 8-pin EPS CPU power cable at the top of the board — it's separate from the 24-pin and easy to forget.
Last: the fiddly front panel connectors — tiny two-pin plugs for your power switch, reset button, and LEDs. Your motherboard manual has the exact pinout. A small flashlight helps more than you'd think.
Step 4: First Boot And BIOS Setup
This is it. Plug everything in, hit the power button, and watch for POST (Power-On Self-Test).
If everything's connected right, you'll land on your BIOS/UEFI setup screen — the same firmware layer responsible for security features like secure boot, which is worth understanding before you start changing settings. From here:
Enable your XMP/EXPO profile so your RAM runs at its rated speed
Confirm your SSD is detected
Set your boot order
Save and exit
Common First-Boot Mistakes (And Fixes)
Symptom | Likely Cause | Fix |
|---|---|---|
No power at all | PSU switch off, or cable not seated | Check the PSU rocker switch and 24-pin connector |
Power on, no display | GPU not seated, or monitor cable in wrong port | Reseat GPU, plug monitor into GPU (not motherboard) |
Beeping on boot | RAM not seated | Reseat RAM in correct slots per manual |
Boots but no OS | No installer detected | Check boot order in BIOS |
Most "no boot" issues come down to something small and fixable — don't panic.
Step 5: Installing Windows And Drivers
Almost there. Boot from a USB installer and run through installing Windows 11. Once you're in, grab your chipset drivers and GPU drivers — these matter more than people realize for stability and performance.
Frequently Asked Questions
How long does it take to build a PC?
Most first-time builders finish an ATX mid-tower build in 3 to 5 hours. Experienced builders typically finish in 1 to 2 hours.
Do I need thermal paste?
Usually no — most modern coolers ship with thermal paste pre-applied. Only add your own if the cooler's base is bare metal.
Is building a PC cheaper than buying one prebuilt?
Yes, typically 20–40% cheaper for equivalent specs, based on current 2026 component pricing.
What's the minimum RAM I need in 2026?
16GB is the sensible minimum for general use; 32GB is recommended for gaming or creative workloads.
Can I build a PC without any prior experience?
Yes. Components are keyed so they physically can't be forced into the wrong slot, and nothing requires soldering.
Final Thoughts: You've Got This
Building a PC feels intimidating right up until you actually do it. The parts are keyed so you can't force them into the wrong spot. Nothing needs soldering. And the entire process, start to finish, usually takes 3 to 5 hours for a first-timer.
You'll save money, you'll understand your machine inside and out, and there's nothing quite like hitting that power button on something you built with your own two hands.
So go build something great.
Written by
Alex
Creative blogger sharing insights, stories, and fresh ideas.